DFIR Tools PART 2

FTK Imager (Memory Imaging Tool/ Analyzer)
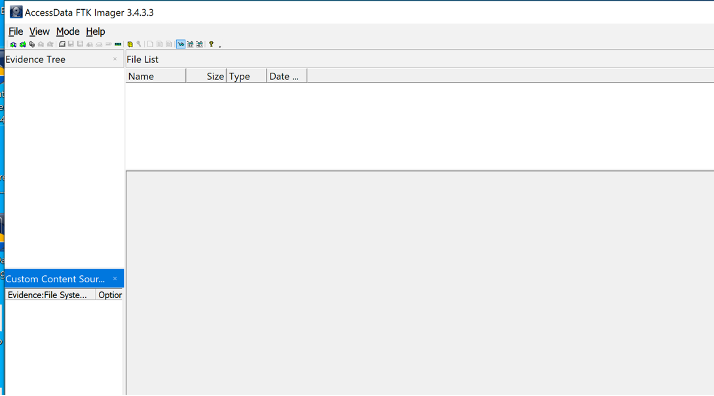
This is a data preview and imaging tool with which one can study files and folders on a hard drive, network drive, and CDs/DVDs. It allows you to:
1) review forensic memory dumps or images. 2) create MD5 or SHA1 file hashes that are already deleted from the recycle bin, if their data blocks have not already been overwritten. 3) mount forensic images to view their contents in browser.
How to use :
1)	download the exe from : [https://accessdata.com/product-download/ftk-imager-version-3-2-0](https://accessdata.com/product-download/ftk-imager-version-3-2-0 )
2)	run the exe file on the target machine.
Comment:
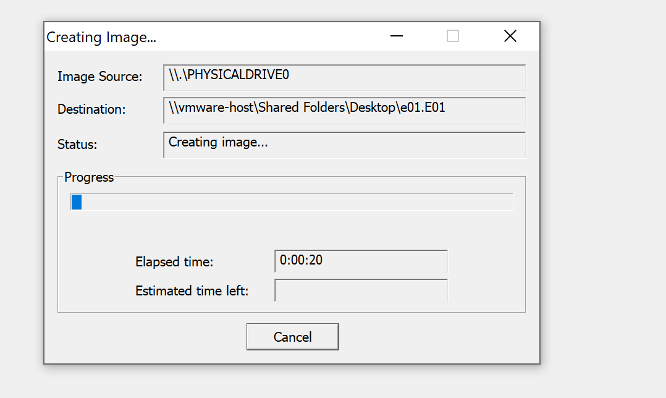
Pros: Creates bit-by-bit image and creates exact replica of the drive, thus allowing the investigator to view deleted or irretrievable files. It also creates a keyword index for every image, which makes future searches easier.
Cons: It doesn’t carve files and lacks recursive export capabilities.
Magnet RAM Capture (Memory Imaging Tool)
Magnet Ram Capture is one of the many tools provided by Magnet Forensics. It is a free tool that captures the physical memory of a computer. This can help forensic investigators recover and analyze useful artifacts in the computer’s memory.
Having a small memory footprint, the tool can be run while the overwritten data in the memory is minimized. The collected memory data can be exported in RAW format and uploaded into any of the forensic analysis tools.
The tool collects:
1) processes and programs 2) network connections 3) registry hives 4) malware intrusion evidence 5) decrypted keys and files 6) usernames and passwords 7) any other activity not usually stored on the hard disk.
How to use:
1)	Download the exe file from: [https://www.magnetforensics.com/resources/magnet-ram-capture/](https://www.magnetforensics.com/resources/magnet-ram-capture/)
2)	Install the exe on target machine
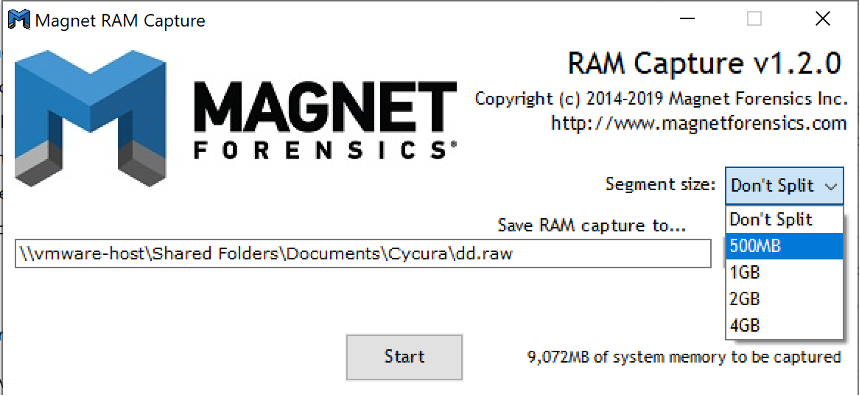 Comment: Acquires full physical memory fast and less footprint. Also Very easy to use.
Memoryze
It a free tool from Mandiant to assist with Windows memory analysis.
Features of Memoryze can be found on : https://www.fireeye.com/services/freeware/memoryze.html
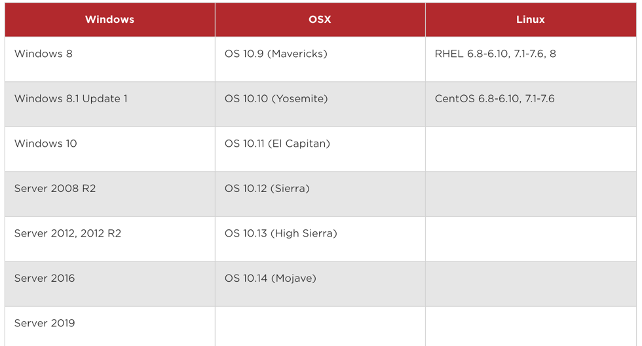
OS Supported : Windows, Mac
How to Use:
1)	Download the msi from
https://www.fireeye.com/services/freeware/memoryze.html
2)	Install the msi on the target computer
3)	Open up cmd as administrator and navigate to the installed folder.
4)	Cd C:\Program Files (x86)\MANDIANT\Memoryze
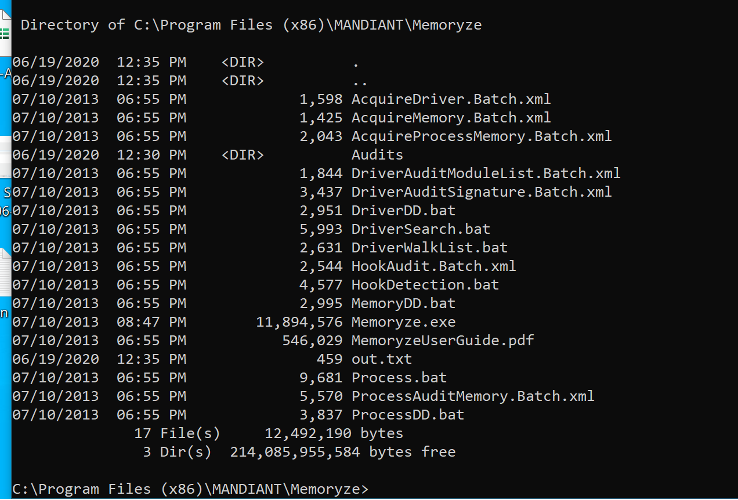
Content of the folder 1) We will use MemoryDD.bat to create raw image
Usage: MemoryDD.bat -offset optional offset into physical memory. Exclude for all. -size optional size of physical memory to acquire. Exclude for all. -output directory to write the results. Default .\Audits
2) Enter “MemoryDD.bat”, this command will open a new command line and initiate the memory dump

1) All dump and associated files will be stored in a folder called “Audit”

Comment: Any issue that where encountered during the image dump will be stored in an XML file for further review.
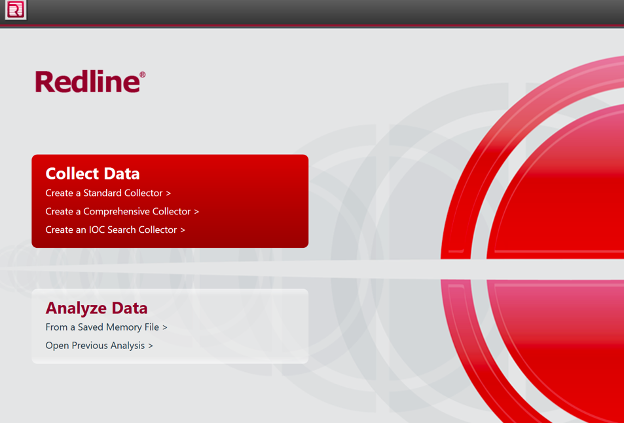
RED Line (Image Analyzer)
Supported Platforms:
collector option:
This option will create a folder which can be used for audit purpose of a victim machine in which malware(artifact) is running. This will create RunRedlineAudit.bat, which will collect necessary information that can be audited by redline. We just to create a folder on the machine where Redline is running using collector option where it will create the bat file. We have to take that batch file either by USB or shared network folder to the victim machine.
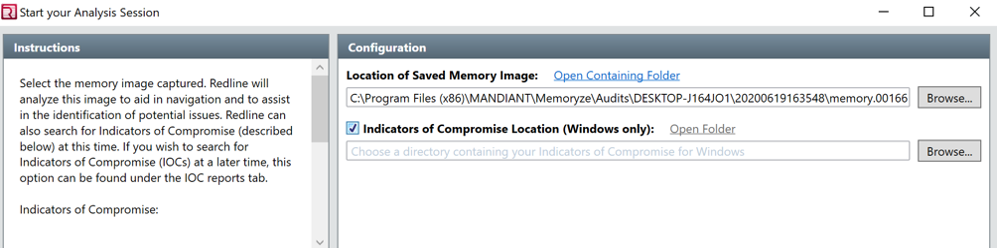
Investigation using Redline Memory Analyzer option
Use an image file from a tool such a memoryze to create an image and use this tool to analyze the image. After taking the image, we will analyze using Redline for further investigation. First, we will place the image into Redline: choose IOC. For IOC, you first have to download it from FireEye.
How to use:
1)	Download the .msi from https://www.fireeye.com/services/freeware/redline.html
2)	install it on the target system
3)	open it from C:\Program Files (x86)\Redline
Comment: Redline is a great tool for forensic investigation as it is very useful for investigating useful info like Process Injection, Mutex, Semaphore, etc. in the system. Also, this tool classifies the threats as per the MRI score.
Volatility
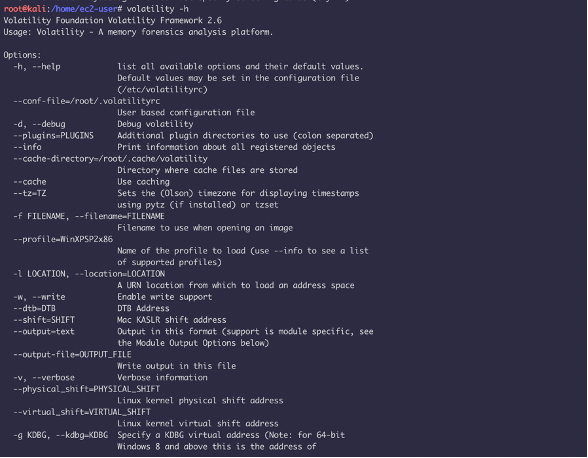
Volatility is an open source framework used for memory forensics and digital investigations. The framework inspects and extracts the memory artifacts of both 32-bit and 64-bit systems. The framework has support for all flavours of Linux, Windows, MacOS and Android. It can analyse raw memory dumps, crash dumps, virtual machine snapshots, VMware dumps (.vmem), Microsoft crash dumps, hibernation files, virtual box dumps, and many others. The framework is intended to investigate the system’s state independently and consists of over 35 plugins for analyzing
How to use:
Linux:
1) apt-get install volatility
Windows:
Windows need additional packages for this framework to work. This should be manually installed for the tool to work properly.
● Distorm 3: A powerful disassembler library for x86/AMD64 ● Yara: A malware identification and classification tool ● Pycrypto: The Python cryptography toolkit ● Pillow: The Python imaging library ● Openpyxl: The Python library to read/write Excel ● Ujson: An ultra-fast JSON parsing library ● Pytz: This is for time zone conversion
1) Download the standalone or python win32 version from https://www.volatilityfoundation.org/26 2) To understand the usage of the tool use the syntax: python vol.py –h
Syntax:
1) Imageinfo: This identifies the profile image. The syntax is: a. python vol.py imageinfo –f filename 2) Pslist: This lists the running process. The syntax is: a. python vol.py pslist –f filename 3) Psscan: This plugin scans the hidden/inactive/unlinked processes and is used for malware analysis. The syntax is: a. python vol.py psscan –f filename 4) Pstree: This plugin displays the running process in tree form. The syntax is: a. python vol.py pstree –f filename 5) Timeliner: This creates a timeline from various artefacts in memory. The syntax is: a. python vol.py timeliner –f filename 6) Wintree: This prints the Z-Order Desktop Windows tree. The syntax is: a. python vol.py wintree –f filename
Guymager - Forensic Disk Imager
Guymager is an open source forensic disk imager tool for media acquisition. This tool is only available only on Linux, and it comes pre-installed with Kali Linux. With this process we can clone an entire disk like pen drives or hard disks or memory cards.
● Very easy GUI user interface in different language. ● Really fast process due to multi-threaded, pipelined design and multi-threaded data compression. ● makes full usage of multi-processor machines. ● Generates flat (dd), EWF(E01) and AFF images, supports disk cloning
Run by : sudo guymager
Usage: 1) We can use the “Rescan” option to scan newly attached devices. 2) For cloning, just click on clone and another window will open. 3) Here we can choose the file format and provide the case number and evidence number, examiner name, descriptions and notes. Here we can also choose the image directory. We can also split the size of disk. We can calculate MD5 and SHA1 and SHA-256. 4) Click on start to begin the process.
Comment: easy to use due to GUI interface.
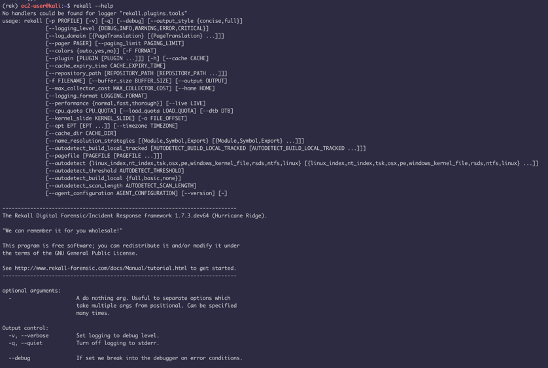
Rekall
The Rekall Framework is a completely open collection of tools, implemented in Python under the Apache and GNU General Public License, for the extraction and analysis of digital artifacts computer systems.
https://github.com/google/rekall
How to use: 1) $ virtualenv /tmp/MyEnv 2) New python executable in /tmp/MyEnv/bin/python 3) Installing setuptools, pip…done. 4) $ source /tmp/MyEnv/bin/activate 5) $ pip install –upgrade setuptools pip wheel 6) $ git clone https://github.com/google/rekall.git rekall 7) $ pip install –editable rekall/rekall-lib 8) $ pip install –editable rekall/rekall-core 9) $ pip install –editable rekall/rekall-agent 10) $ pip install –editable recall
Comments: This tool requires specific versions of pip modules so if the system already have a different version of the same module, the tool won’t install. Configuration and installing is very difficult (the only working way to install the tool is from GitHub using –-editable)
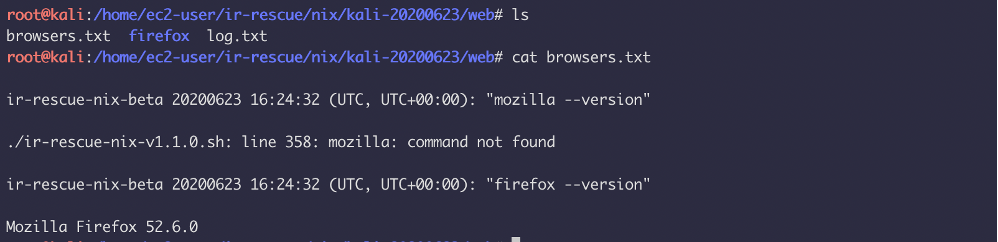
ir-rescue
ir-rescue is composed of two sister scripts that collect a myriad of forensic data from 32-bit and 64-bit Windows systems (ir-rescue-win) and from Unix systems (ir-rescue-nix). The scripts respect the order of volatility and artifacts that are changed with the execution (e.g., prefetch files on Windows) and are intended for incident response use at different stages in the analysis and investigation process.
How to use:
1) Clone the GitHub reporsitory into a UNIX machine 2) Chmod +X ir-rescue-nix-v1.1.0.sh 3) ./ir-rescue-nix-v1.1.0.sh

The results are saved Into a zip file in the same folder.
Comment: After running this script, the script didn’t pull a lot of helpful information from the system. Some of the folders were empty. It queries for Mozilla version but miss to extract sys.log/bash history/apache log etc.
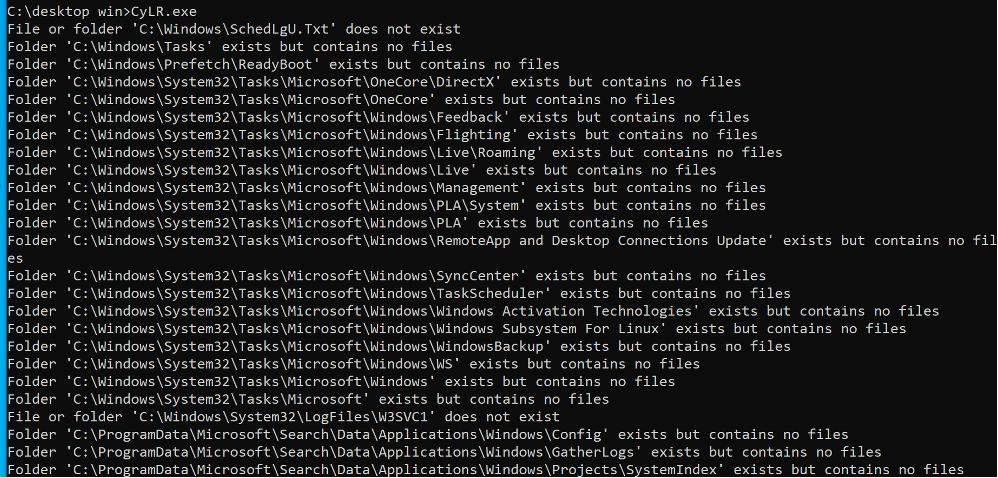
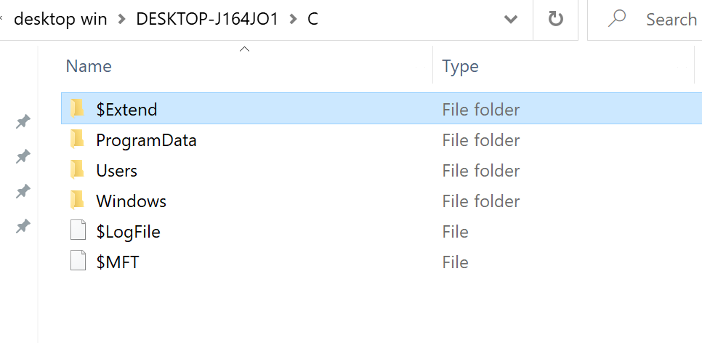
CyLR
This tool collects forensic artifacts from hosts with NTFS file systems quickly, securely and minimizes impact to the host.
The main features are:
● Quick collection (it’s really fast) ● Raw file collection process does not use Windows API ● Optimized to store the collected artifacts in memory (minimizing or removing entirely the need to write additional artifacts on the host disk) ● Built in SFTP capability
How to use: 1) Download the executable from GitHub: https://github.com/orlikoski/CyLR 2) Use admin privileged command line to execute the exe file 3) Collect artifacts and send data to SFTP server 1.2.3.4: a. CyLR.exe -u username -p password -s 1.2.3.4
 The output of the program will be stored In the same directory in a zip file.
OS Supported: ● Windows ● Linux ● Mac OS
Comment: Super-fast, collect a lot of logs and sftp build in functionality is an amazing feature.
Bulk_extractor
bulk_extractor is a computer forensics tool that scans a disk image, a file, or a directory of files and extracts useful information without parsing the file system structure. Using this approach, bulk_extractor is more fast than other forensic tools and can process different parts of the disk in parallel, splitting the disk up into 16MiByte pages and processes one page on each available core.
Furthermore, bulk_extractor can be used to process any digital media, like hard drives, SSDs, optical media, camera cards, cell phones, network packet dumps, and other kinds of digital information.
bulk_extractor can extract a lot of informations:
● Credit card numbers ● Credit card “track 2″ information ● Internet domains found on the drive, including dotted-quad addresses found in text. ● Email addresses ● Ethernet MAC addresses found through IP packet carving of swap files and compressed system hibernation files and file fragments. ● EXIFs from JPEGs and video segments. ● Results of specific regular expression search requests. ● IP addresses found through IP packet carving. ● US and international telephone numbers. ● URLs, typically found in browser caches, email messages, and pre-compiled into executables. ● A histogram of terms used in Internet searches from services such as Google, Bing, Yahoo, and others. ● A list of all “words” extracted from the disk, useful for password cracking. ● A list of every ZIP file component found on the media.
How to use:
1) Download it from the github: https://github.com/simsong/bulk_extractor 2) Clone the repo in ubuntu 3) Cd /etc

4) Install the configuration according to the OS (./configure) 5) bulk_extractor -o bulk-ex sample.img – This will analyze the image the output onto a folder
Comment: Easier to run on kali linux
Kape
Kroll Artifact Parser and Extractor (KAPE) is primarily a triage program that will target a device or storage location, find the most forensically relevant artifacts (based on your needs), and parse them within a few minutes. Because of its speed, KAPE allows investigators to find and prioritize the more critical systems to their case. Additionally, KAPE can be used to collect the most critical artifacts prior to the start of the imaging process. While the imaging completes, the data generated by KAPE can be reviewed for leads, building timelines, etc.
How to use:
1)	Download the executables into target machine : [https://www.kroll.com/en/services/cyber-risk/investigate-and-respond/kroll-artifact-parser-extractor-kape](https://www.kroll.com/en/services/cyber-risk/investigate-and-respond/kroll-artifact-parser-extractor-kape)
2)	 Use PowerShell as admin to navigate to the downloaded directory
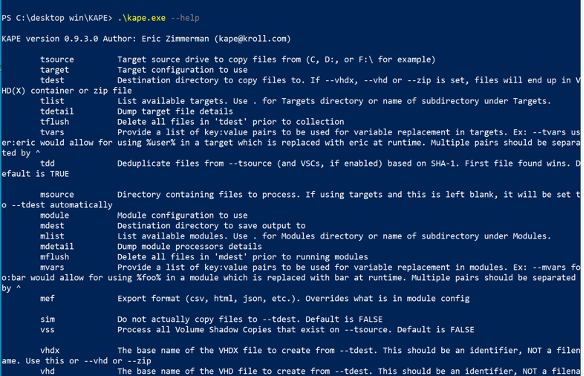
While there are quite a few options, things are generally broken down into two main categories: Targets and Modules.
Target options start with ‘t’ and module options start with ‘m’ and are grouped together as shown above. ● For targets, –tsource,– tdest, and –target are all required. ● For modules, –msource, –mdest, and –module are required
Comment: KAPE is a command line tool and it is fast. It copied about 700 files in under a second
Belkasoft Live RAM Capturer
Belkasoft Live RAM Capturer is a tiny free forensic tool that allows to reliably extract the entire contents of computer’s volatile memory – even if protected by an active anti-debugging or anti-dumping system. Separate 32-bit and 64-bit builds are available in order to minimize the tool’s footprint as much as possible. Memory dumps captured with Belkasoft Live RAM Capturer can be analyzed with Live RAM Analysis in Belkasoft Evidence Center.
It’s important to note that Live RAM Capturer complies all the forensic requirements of memory capturing: it operates in kernel mode, leaves the smallest footprint possible, it’s portable and uses read-only access.
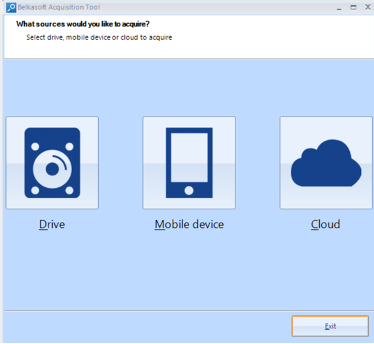
Belkasoft Acquisition Tool
Belkasoft Acquisition Tool helps investigators to complete one of the most important steps of investigation: obtaining data from a data source. Four types of data sources are currently supported:
● Hard or removable drives ● Mobile devices ● Computer RAM memory ● Cloud data The acquired image can be then analyzed with Belkasoft Evidence Center or any third-party tool.
Dshell
The framework handles stream reassembly of both IPv4 and IPv6 network traffic and also includes geolocation and IP-to-ASN mapping data for each connection. The framework also enables development of network analysis plug-ins that are designed to aid in the understanding of network traffic and present results to the user in a concise, useful manner by allowing users to parse and present data of interest from multiple levels of the network stack. Since Dshell is written entirely in Python, the entire code base can be customized to particular problems quickly and easily; from tweaking an existing decoder to extract slightly different information from existing protocols, to writing a new parser for a completely novel protocol.
How to use:
1) Install the dependencies required: sudo pip install geoip2 pycrypto dpkt IPy pypcap 2) Run “make” - This will build Dshell. 3) Run ./dshell.
 decode -l : This will list all available decoders alongside basic information about them
decode -h : Show generic command-line flags available to most decoders
decode -d
decode -l : This will list all available decoders alongside basic information about them
decode -h : Show generic command-line flags available to most decoders
decode -d
Features:
● Robust stream reassembly ● IPv4 and IPv6 support ● Custom output handlers ● Chainable decoders
Comment: Good at analyzing network packets.
Scot

SCOT is a cyber security incident response (IR) management system designed by cyber security incident responders to provide a new approach for managing security alerts.
SCOT’s ease of use eliminated the steep learning curve of traditional SIEMS and captured team knowledge much more effectively. Designed for cyber security, SCOT allows the IR team to enter data easily, instead of struggling to conform to a ticketing system designed for other purposes. While workflow systems handle linear workflows easily, SCOT is purpose built for the looping nature of cyber security investigations. SCOT also solves the challenges of keeping wikis, spreadsheets and documents up-to-date and accessible to an IR team.
Guide: https://scot.readthedocs.io/en/latest/overview.html
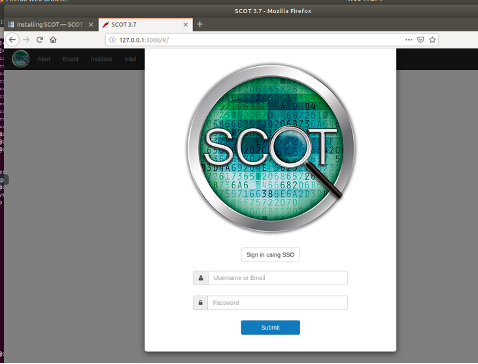

How to install (run as root):
1) $ git clone https://github.com/sandialabs/scot.git scot 2) cd into the directory 3) # ./install.sh 2>&1 | tee ../scot.install.log
Issue: After install, I get this issue.
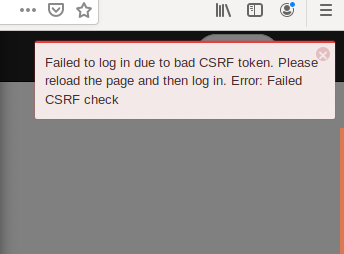
Solution: Clear cache or hard restart the browser.
Comment: This tool provides a similar functionality as SIEM. Installation take a long time and troubleshooting can be quite difficult.
MIG
MIG provides a platform to perform investigative analysis on remote systems. By using the right queries, information can be obtained from these systems. This all happens in parallel, making intrusion detection, investigation, and follow-up easier.
How it works
MIG uses a client-server model and communicates via AMQP. By using custom queries or pre-defined JSON files (playbooks), all endpoints can be queried. All communications are encrypted or signed, to decrease the chance of a malicious actor abusing the platform.
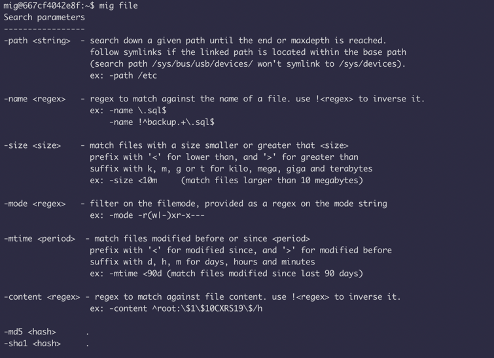
How to use:
1) docker pull mozilla/mig 2) docker run -it mozilla/mig
Comment: The container is not suitable for production use but lets you experiment with MIG quickly, providing a single container environment that has most of the MIG components available.
OSQUERY
osquery exposes an operating system as a high-performance relational database. This allows you to write SQL-based queries to explore operating system data. With osquery, SQL tables represent abstract concepts such as running processes, loaded kernel modules, open network connections, browser plugins, hardware events or file hashes.
How to install:
1) Download from : https://osquery.io/downloads 2) Navigate to the installed directory using CMD 3) Execute osquery.exe
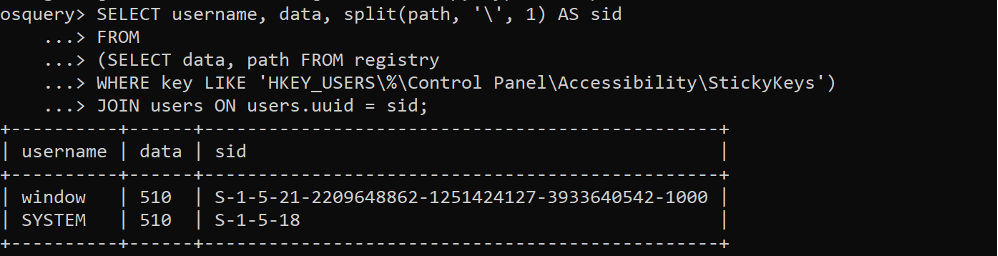
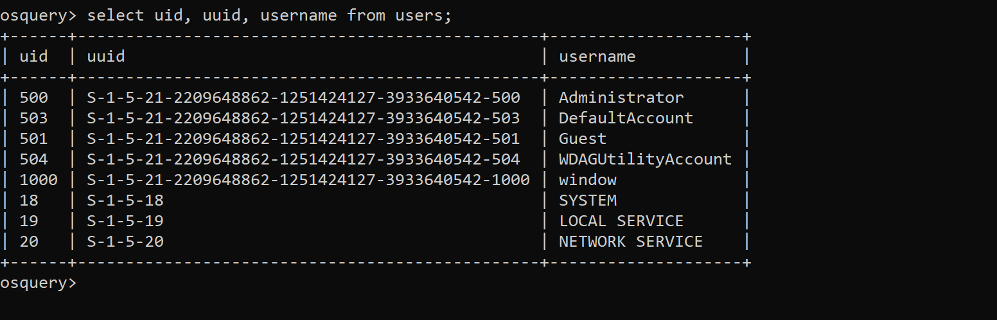
Comment: This tool makes it super easy to query. However, user must have understating of syntax of SQL queries in order to work with this tool.
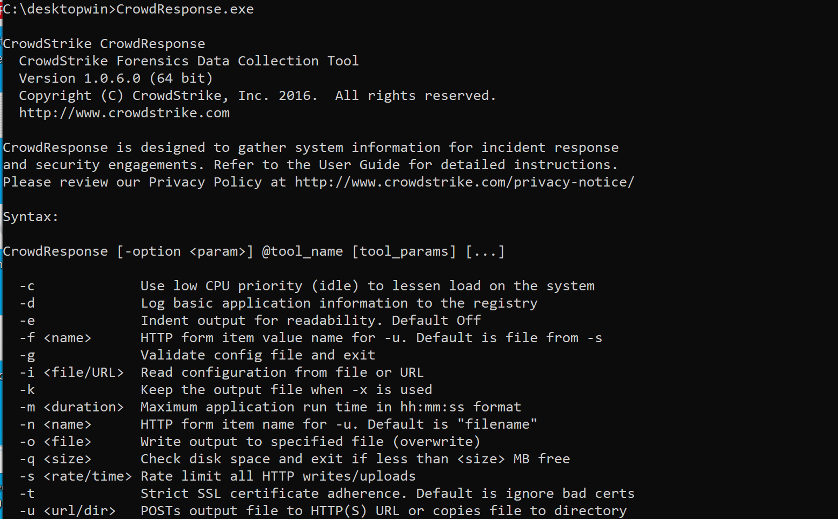
Crowd Strike
CrowdResponse is a lightweight console application that can be used as part of an incident response scenario to gather contextual information such as a process list, scheduled tasks, or Shim Cache. Using embedded YARA signatures you can also scan your host for malware and report if there are any indicators of compromise.
How to install:
1) Download the zip file from: https://www.crowdstrike.com/resources/community-tools/crowdresponse/
2) extract the ZIP file and launch a Command Prompt with Administrative Privileges
Additional usage information:
Navigate to the folder where the CrowdResponse*.exe process resides and enter your command parameters. At minimum, you must include the output path and the ‘tool’ you wish to use to collect data. For a full list of ‘tools’, enter CrowdResponse64.exe in the command prompt and it will bring up a list of supported tool names and example parameters.
Once you’ve exported the data you need, you can use CRconvert.exe to convert the data from XML to another file format like CSV or HTML.
Key features:
● Comes with three modules – directory-listing, active running module, and YARA processing module. ● Displays application resource information ● Verifies the digital signature of the process executable. ● Scans memory, loaded module files, and on-disk files of all currently running processes
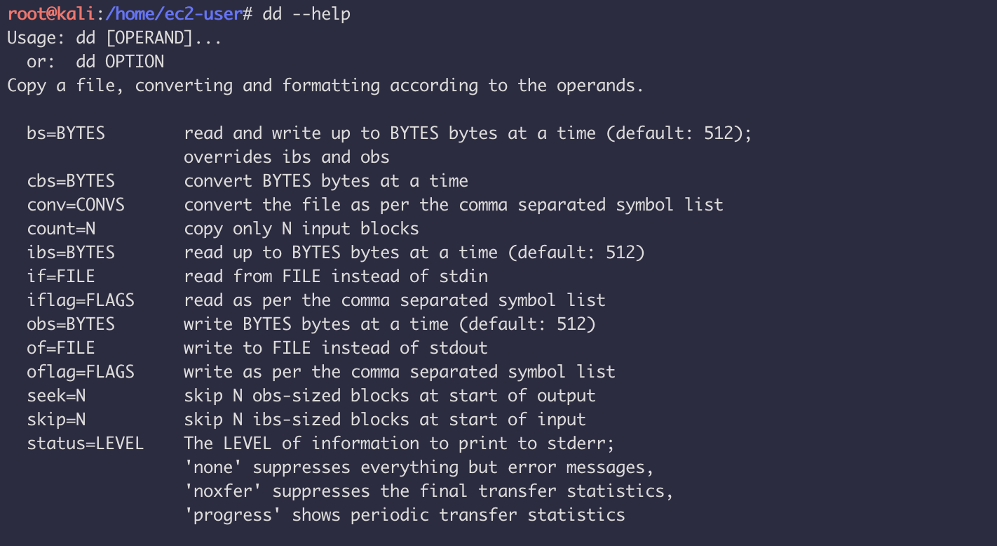
Linux ‘dd’
dd comes by default on the majority of Linux distributions available today (e.g. Ubuntu, Fedora). This tool can be used for various digital forensic tasks such as forensically wiping a drive (zero-ing out a drive) and creating a raw image of a drive.
Key features:
● Duplicates data across files, devices, partitions, and volumes. ● Supports master boot record backup and restore. ● It can modify data easily ● Needs to be used with caution as it can wipe a disk completely.
Usage: 1) The basic dd syntax for forensically wiping a drive is:
dd if=/dev/zero of=/dev/sdb1 bs=1024 | where if = input file, of = output file, bs = byte size
2) The basic dd syntax for creating a forensic image of a drive is:
| dd if=/dev/sdb1 of=/home/andrew/newimage.dd bs=512 conv=noerror,sync | where if = input file (or in this case drive), of = output file, bs = byte size, conv = conversion options |
Caine
CAINE (Computer Aided INvestigative Environment) is Linux Live CD that contains a wealth of digital forensic tools. Features include a user-friendly GUI, semi-automated report creation and tools for Mobile Forensics, Network Forensics, Data Recovery and more.
When you boot into the CAINE Linux environment, you can launch the digital forensic tools from the CAINE interface (shortcut on the desktop) or from each tool’s shortcut in the ‘Forensic Tools’ folder on the applications menu bar.
Key features 1) Comes with a user-friendly interface that brings together many open-source forensics tools. 2) Adheres to the investigation procedure laid down by Italian laws. 3) Its environment is optimized for in-depth forensic analysis 4) Generates reports that are easily editable and exportable.
RegRipper
RegRipper is a flexible open source tool that can facilitate registry analysis with ease. It contains pre-written Perl scripts for the purpose of fetching frequently needed information during an investigation involving a Windows box. We are using RegRipper because of the simplicity of the tool and the availability of numerous plugins that capture specific information from the registry.
https://code.google.com/archive/p/regripper/downloads
Comment: Extract information such as keys, subkeys and relevant values: user profiles, applications, configurations, desktop, network connections, printers, etc.