OWASP ZAP & GITHUB ACTION – DAST Automation from Scratch

In this post, I’m discussing how we can do DAST scan using GitHub Actions and the OWASP ZAP. You can also run this tool stand-alone, or through Azure DevOps.
If you are not familiar with GitHub Action, read this GitHubAction
If you have security background, you will definitely know what OWASP ZAP is, if you don’t here is the official website: OWASPZAP
Why am I writing this blog?
From an Secure-SDLC perspective, when a new code is pushed to GitHub, we should be able to scan the newly enhanced code, so far a lot of the configuration I have seen is just pointing to a target URL which is already deployed in UAT/SIT, so the DAST scan isn’t really scanning the new code.
For example, let’s take this workflow as an example:
name: scan
on:
  push:
    branches: [ master ]
  pull_request:
    branches: [ master ]

jobs:
  build:
    runs-on: ubuntu-latest
    steps:
    - name: OWASP ZAP Baseline Scan
      uses: zaproxy/[email protected]
      with:
        target: https://your-website.com/
If I have created a new page on my application and pushed the code into github, the above workflow will scan the target “your-website.com”, but since the new code is not yet deployed on “your-website.com”, what really is the scan doing? I am sure you guessed it, it is scanning what is already deployed.
Now what is a solution for this?
What if we create a docker container in our runner VM and scan it locally!
So, let’s try and write a sample workflow for this:
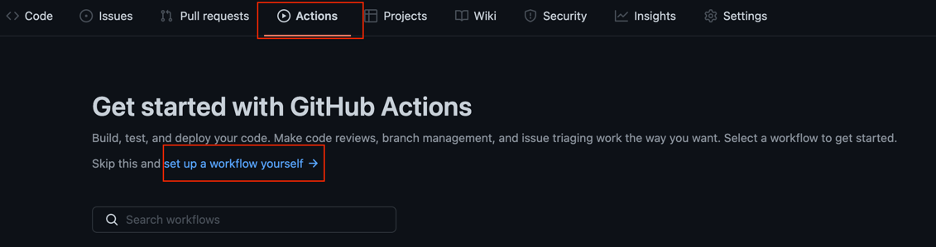
Step 1: Go to your Github, and click on “Actions” and then “set up a workflow yourself”
Step 2: Put the below content on the YML file:
name: ZAP

on:
  push:
    branches: [ master ]

jobs:
  build:
    runs-on: ubuntu-18.04
    steps:
      - uses: actions/checkout@v2
      - name: Setup Python 2.7.18
        uses: actions/setup-python@v1
        with:
          python-version: 2.7.18
      - name: Install python deps
        run: |
          python -m pip install --upgrade pip
          pip install requests python-owasp-zap-v2.4
      - name: Get working directory
        run: echo $(PWD)
      - name: Build Image
        run: docker build -t sample-app .
      - name: Install OWASP ZAP
        run: |
          mkdir -p ./zap
          cd ./zap
          wget -N https://github.com/zaproxy/zaproxy/releases/download/v2.9.0/ZAP_2.9.0_Linux.tar.gz
          tar -zxvf ZAP_2.9.0_Linux.tar.gz
          rm ZAP_2.9.0_Linux.tar.gz
          cd ZAP_2.9.0/plugin
          wget https://github.com/zaproxy/zap-extensions/releases/download/exportreport-v6/exportreport-alpha-6.zap
          echo 'export PATH_ZAP_SH=./zap/ZAP_2.9.0/zap.sh' >> ~/.bashrc
          echo 'export ZAP_PORT=8090' >> ~/.bashrc
          echo 'sh -c "$PATH_ZAP_SH -daemon -host 0.0.0.0 -port $ZAP_PORT -configfile ./zap/ZAP_2.9.0/conf" > /dev/null & ' > start-zap
          echo 'sleep 40' >> start-zap
          echo 'sh -c "$PATH_ZAP_SH -host 0.0.0.0 -port $ZAP_PORT -configfile ./zap/ZAP_2.9.0/conf" > /dev/null & ' > start-gui-zap
          echo 'sleep 50' >> start-gui-zap
          echo 'pkill -f zap' > stop-zap
          chmod +x start-zap
          chmod +x start-gui-zap
          chmod +x stop-zap
          echo $pwd
      - name: Run Docker Container
        run: docker run -d -p 4444:4444 sample-app
      - name: Run ZAP Daemon
        run: ./zap/ZAP_2.9.0/zap.sh -daemon -host 0.0.0.0 -port 8090 -config api.addrs.addr.name=".*" -config api.addrs.addr.regex=true -config api.disablekey=true > /dev/null &
      - name: Sleep for a bit
        uses: jakejarvis/wait-action@master
        with:
          time: '20s'
      - name: Run Test Automation with ZAP
        run: |
          cd ./script/
          python zap.py
      - name: "Upload Report"
        uses: actions/upload-artifact@v1
        with:
          name: zap-scan-report
          path: ./script/report.html
Now I will try to explain what is happening by breaking down the YML file, the first part is where we define the workflow name as ZAP, and we are saying that we want to run this during a push to master branch. The runner is going to be on an Ubuntu-18.04 VM
name: ZAP

on:
  push:
    branches: [ master ]

jobs:
  build:
    runs-on: ubuntu-18.04
Now we are using an already defined action called setup-python to install all the dependencies we need for OWASP ZAP and also you will see I am using another python script to run my scans later in this writeup:
      - name: Setup Python 2.7.18
        uses: actions/setup-python@v1
        with:
          python-version: 2.7.18
      - name: Install python deps
        run: |
          python -m pip install --upgrade pip
          pip install requests python-owasp-zap-v2.4
      - name: Get working directory
        run: echo $(PWD)
So now we are building our sample app inside our VM on a docker container from the docker. Note that I just created a “hello world” spring-boot application for demo purposes (this app does not have any vulnerabilities)
Here you can see the docker file : dockerfile
Note: Alternatively you can pull a docker image from Docker hub or an antifactory of your choosing!
- name: Get working directory
        run: echo $(PWD)
      - name: Build Image
        run: docker build -t sample-app .
This is where we install OWASP zap from scratch, I don’t like using the one on the marketplace because I have experienced some networking issues while running “runners” parallelly !
So we can using “wget” to pull down ZAP from their official GitHub along with a plugin for report generation (this will help to customize the report). The second part is where we define some environmental variables.
- name: Install OWASP ZAP
        run: |
          mkdir -p ./zap
          cd ./zap
          wget -N https://github.com/zaproxy/zaproxy/releases/download/v2.9.0/ZAP_2.9.0_Linux.tar.gz
          tar -zxvf ZAP_2.9.0_Linux.tar.gz
          rm ZAP_2.9.0_Linux.tar.gz
          cd ZAP_2.9.0/plugin
          wget https://github.com/zaproxy/zap-extensions/releases/download/exportreport-v6/exportreport-alpha-6.zap
          echo 'export PATH_ZAP_SH=./zap/ZAP_2.9.0/zap.sh' >> ~/.bashrc
          echo 'export ZAP_PORT=8090' >> ~/.bashrc
          echo 'sh -c "$PATH_ZAP_SH -daemon -host 0.0.0.0 -port $ZAP_PORT -configfile ./zap/ZAP_2.9.0/conf" > /dev/null & ' > start-zap
          echo 'sleep 40' >> start-zap
          echo 'sh -c "$PATH_ZAP_SH -host 0.0.0.0 -port $ZAP_PORT -configfile ./zap/ZAP_2.9.0/conf" > /dev/null & ' > start-gui-zap
          echo 'sleep 50' >> start-gui-zap
          echo 'pkill -f zap' > stop-zap
          chmod +x start-zap
          chmod +x start-gui-zap
          chmod +x stop-zap
          echo $pwd
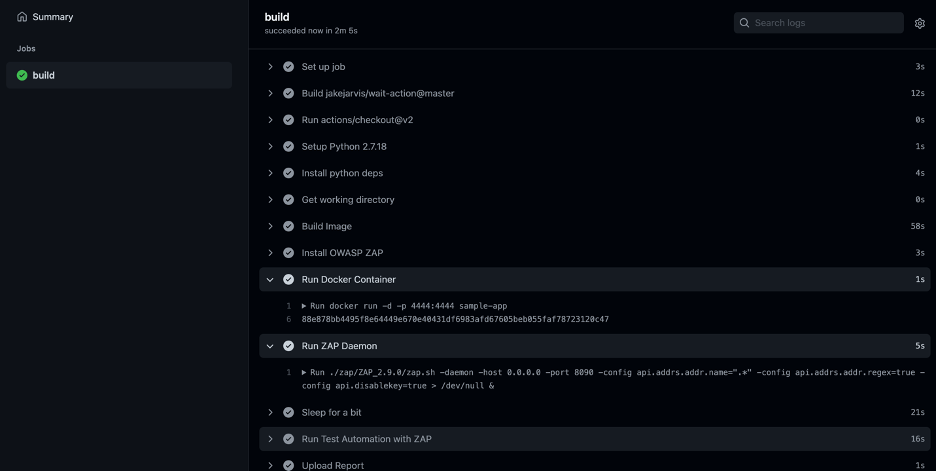
Now with OWASP ZAP being setup and our sample-app build on docker contain, let’s start ZAP on port 8090 and run our app on port 4444:
**Note: we have disabled API key **
- name: Run Docker Container
        run: docker run -d -p 4444:4444 sample-app
      - name: Run ZAP Daemon
        run: ./zap/ZAP_2.9.0/zap.sh -daemon -host 0.0.0.0 -port 8090 -config api.addrs.addr.name=".*" -config api.addrs.addr.regex=true -config api.disablekey=true > /dev/null &
Here we have used another existing action to sleep for 20 seconds for everything to be up and ready:
- name: Sleep for a bit
        uses: jakejarvis/wait-action@master
        with:
          time: '20s'
This is where I am doing some manual intervention, the “zap.py” script will essentially run a passive and active scan on our target application(running on docker locally) and generate a report.
You can see the zap.py here : zap.py
Why is this script a good idea? Because till now we have just been attacking/scanning apps without any authentication and authorization, so what if the newly added page is inside an authenticated portal? We can modify this script to do authentication and spider pages to be scanned.
In a nutshell what the python script does is, spider the target, perform an active scan and generate an HTML file
- name: Run Test Automation with ZAP
        run: |
          cd ./script/
          python zap.py
Finally, we use “upload-artifact” action to upload the generated HTML report
- name: "Upload Report"
        uses: actions/upload-artifact@v1
        with:
          name: zap-scan-report
          path: ./script/report.html
Once these are all setup, anytime a change is pushed to GitHub, this workflow will run and generate a report.
Let’s see a Demo:
I have this GitHub setup for proof of concept: sample-app
Now I will make change to the README file and push that change:
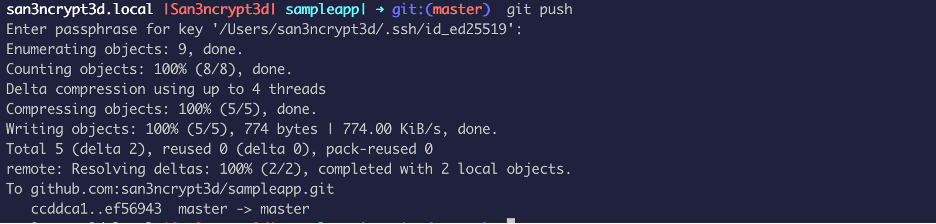
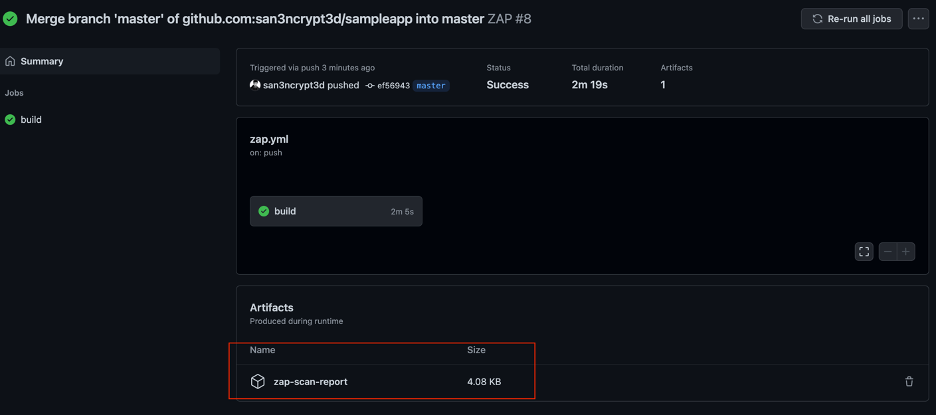
As soon as the “push” happens, the workflow start running

Once the flow is complete, you will have your report as Artifact: